Post by Hoovie on Feb 8, 2018 12:26:33 GMT
by anchorman
Wed Feb 19, 2014 5:12 pm
© RAV4driversclub.com 2014
In this tutorial we will be looking at the process for changing the front pads on the popular 4.3 (Version 3 from 2006 to 2012). Note - the process is similar for the 4.2 and exactly the same for the 4.4.
Difficulty - Easy
Time - About an hour each side.
Tools -
Jack and axle stands.
Wheel brace and locking nut key.
14mm socket or spanner.
17mm socket.
A selection of files, abrasives and cleaning materials
Work in well lit and ventilated conditions.
Introduction
The brake pads on the front of the RAV4 are about the most simple to change that you will ever come across. The pads are mounted in a floating caliper which has a single piston and and a bridge which applies the outboard pad with an equal and opposite force. The disc is mounted directly on the hub with no fixings. Up until 2009, the pads on a 4.3 were made by a Japanese company and were prone to transfering some of the material onto the disc. This could result in excessive corrosion and DTV (disc thickness variation) - a wobble or vibration that could be felt through the car when braking. In this case the only solution is to machine or replace the discs. Discs should only be machined if the minimum thickness of 25mm is not exceeded and then consideration to cost effectiveness should be taken.
Vehicles after 2009 were fitted with a more abrasive German friction material. In fact this has the effect of keeping the discs clean and true. In most cases the ratio of pad/disc wear is not better than 2:1 and in some cases 1:1. Good quality discs made from grey cast iron are readily available. Brake pads are available from Kingo who will post them to you at a discounted rate. The original equipment brake pads in post 2009 RAVs is Textar T4146 and current spares from Kingo should say the same on the back. Avoid old stock which could be the troublesome early material - marked "Advics".
Other suitable friction materials are;
Apec
Ferodo Premier
Pagid (Eurocarparts)
Mintex
Note. Some of these manuafacturers market a budget brand which is designed to compete with cheap imports. Generally you get what you pay for so always try to source good quality parts. If in doubt - ask.
The car used in this tutorial belongs to our very own shcm. His car is maintained to a very high standard and he chose to replace the discs at the same time. The mileage was approximately 40k.
Method
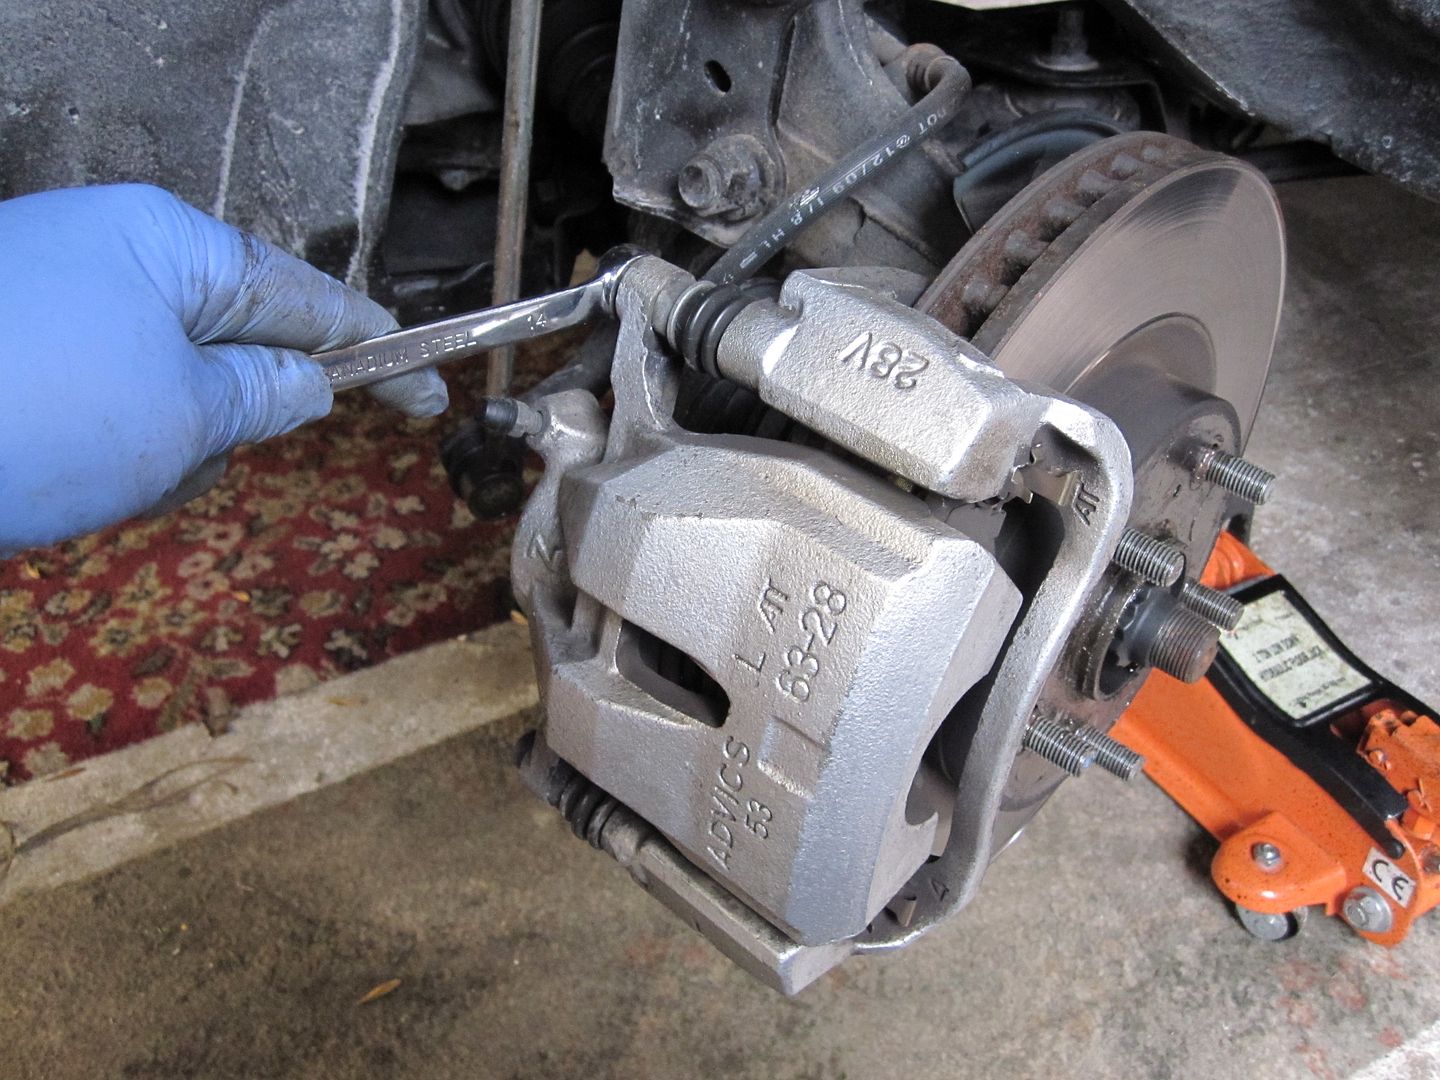
With the road wheel removed and the car place safely on stands, remove the two bolts from the caliper (14mm spanner or socket).
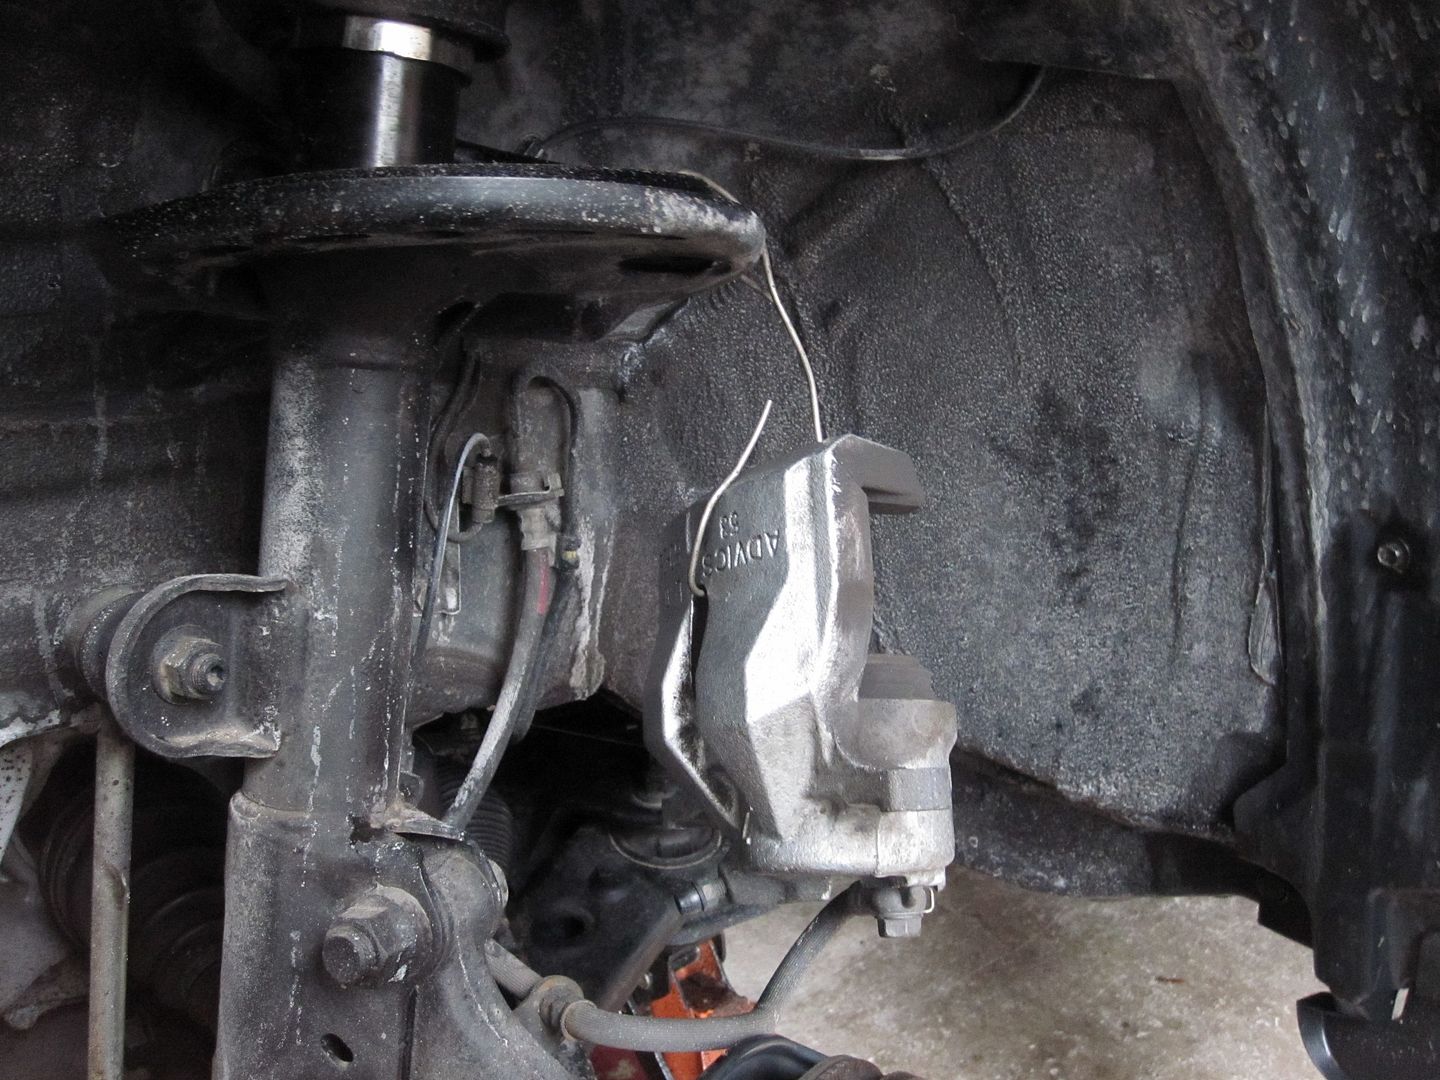
Wriggle the caliper and slide it off the disc. It can now be suspended on a piece of wire. Do not hang it on the pipe.
At this stage you can remove the pads from the carrier. Keep them in their respective places so that you can copy the positions of the shims and clips. Note. Earlier pads were fitted with an audible wear indicator. This goes to the inside and the top. It is absent from post 2009 models. Next, undo and remove the two bolts that hold the carrier to the hub (17mm socket and long bar - tight!). You can see in this photo that I have left the pads in the carrier. You can also see the degree of wear.


With the disc exposed, you can now take a lump hammer and tap off the disc. If the discs are to be re-used, do not disturb them. If they need to be removed for access to another component, be sure to use a piece of wood as shown.

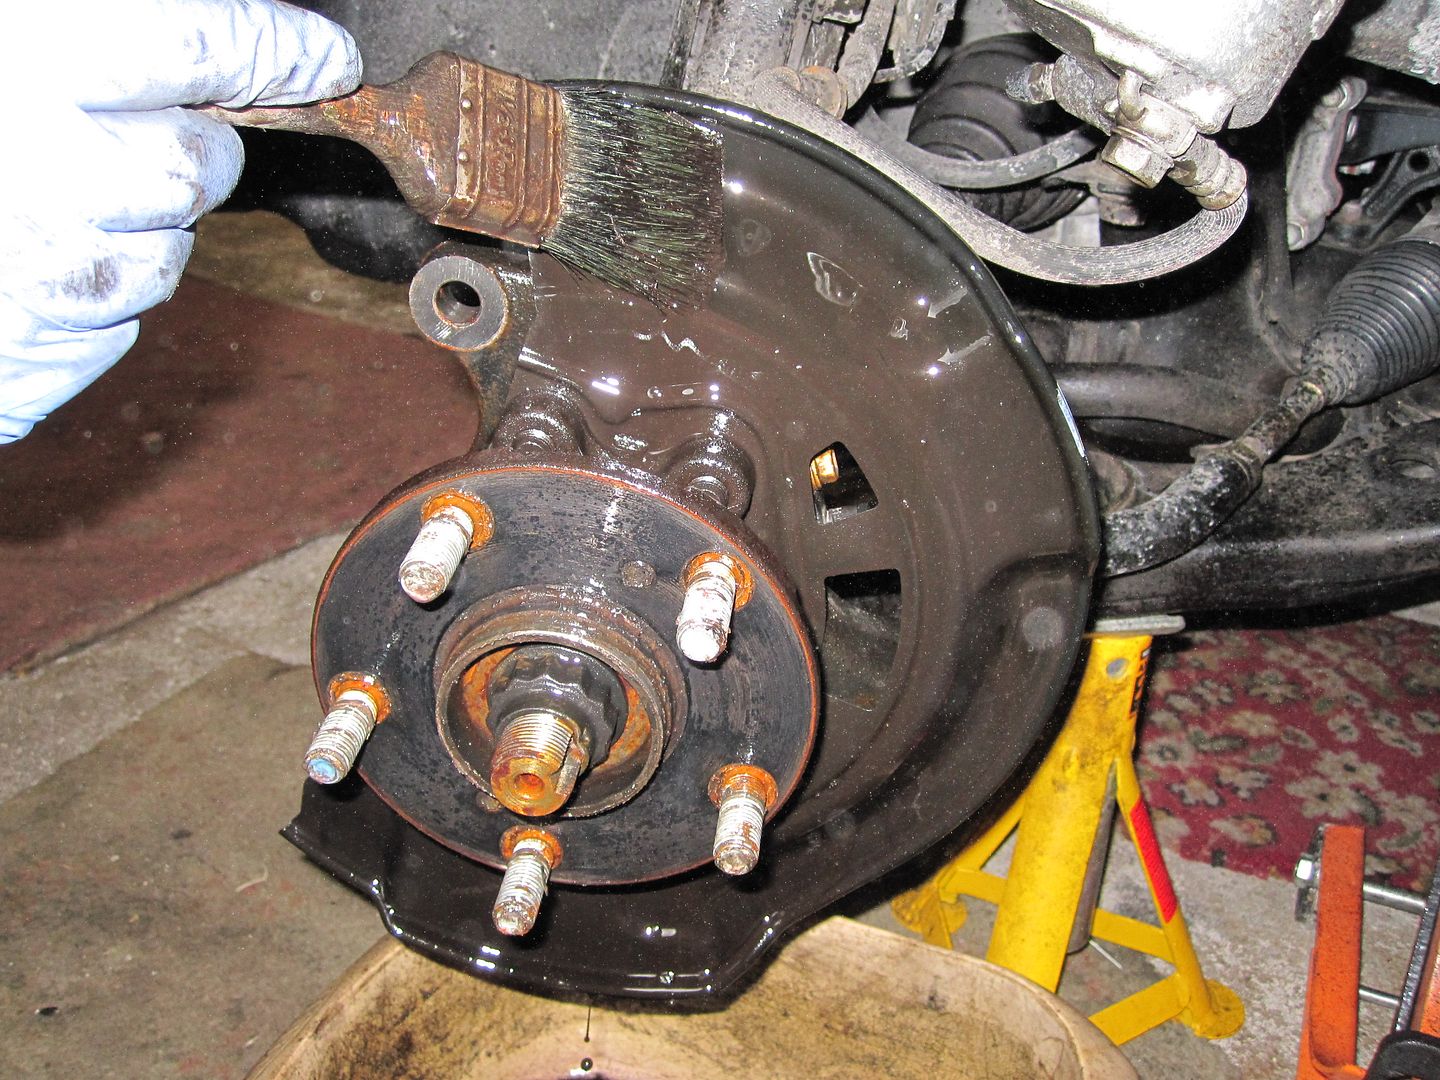
Now its clean up time. I have a bowl with soluble degreaser and a spray. Wash down and dry the backplate and hub.
On the bench, strip down the pads noting their position. You can easily make out the piston side. Wash and dry the shims. If they are damaged significantly, order some off Kingo but sit down for the price. They are expensive but normally re-useable. Do not be tempted to miss them out.
Take the stainless steel locating clips out of the carrier and keep them in their relative positions. Now use a file and a wire brush to remove any corrosion from under the clips. If it is not removed, the rust can cause the pads to stick and the brake to bind. Time spent properly cleaning will reap dividends in terms of reliability. Fit the stainless clips back in the carrier. The looped part goes on the hub side and they face outwards. The little thrust springs on the pads go at the top. While the carrier is off, hold the rubber boot and pop the guide pins out. They are not the same so watch where they came from. Wipe them clean and give them a coat of new grease.
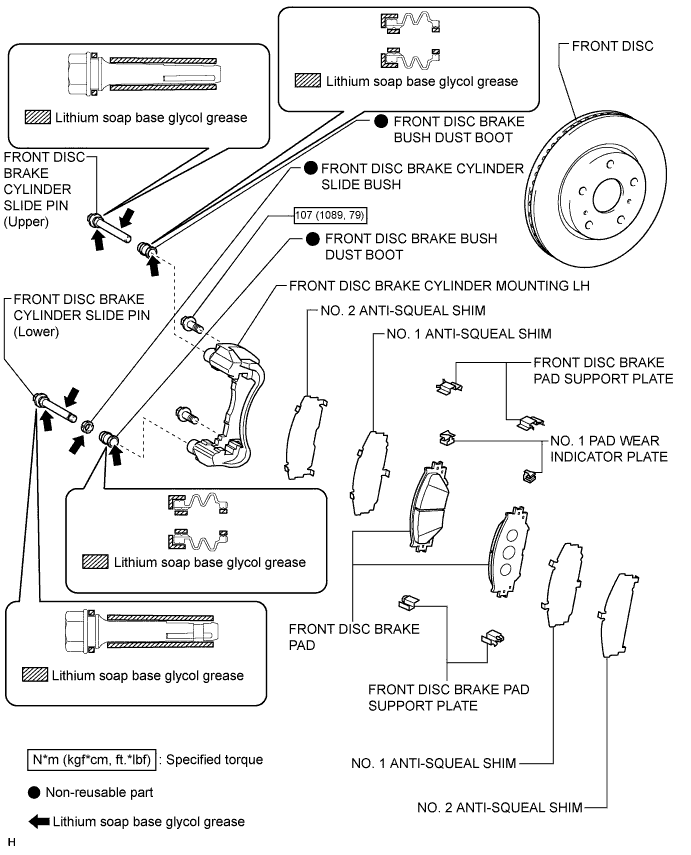
Now is a good time to talk about grease. Despite what the manufacturers say, copper based greases are not ideal for building brakes up. It is good for manifolds and other very high temperature applications but it is clay based and tends to congeal with time. The best grease is Ceratec which is available freely on the internet.
www.ebay.co.uk/itm/MINTEX-CERATEC-CERA-TEC-ANTI-BRAKE-SQUEAL-ADVANCED-LUBRICANT-GREASE-75ml-/110927850373#ht_1780wt_962
Textar is the same brand as the original pads but it is also branded Mintex and Pagid which are all in the same group.

It can safely be used for the rubber parts in the brake but not the main piston seal.
OK, you can start to build the brake up. Mount the disc onto the hub and run a couple of wheel nuts up finger tight just to hold it in place. You will see that it has been thoroughly cleaned and as shcm is very fussy, a couple of coats of matt black paint applied to the exposed part. Black Smoothrite is perfectly acceptable although matt finish is the same as the original.

Install the carrier and tighten the bolts evenly to 79 ft/lb.

Fit the springs and shims to the pads as they came off and fit them into the carrier. Tilt the hub side in first and then just turn the front side in - they will just pop in. Now use a G clamp to slowly press the pistons back.
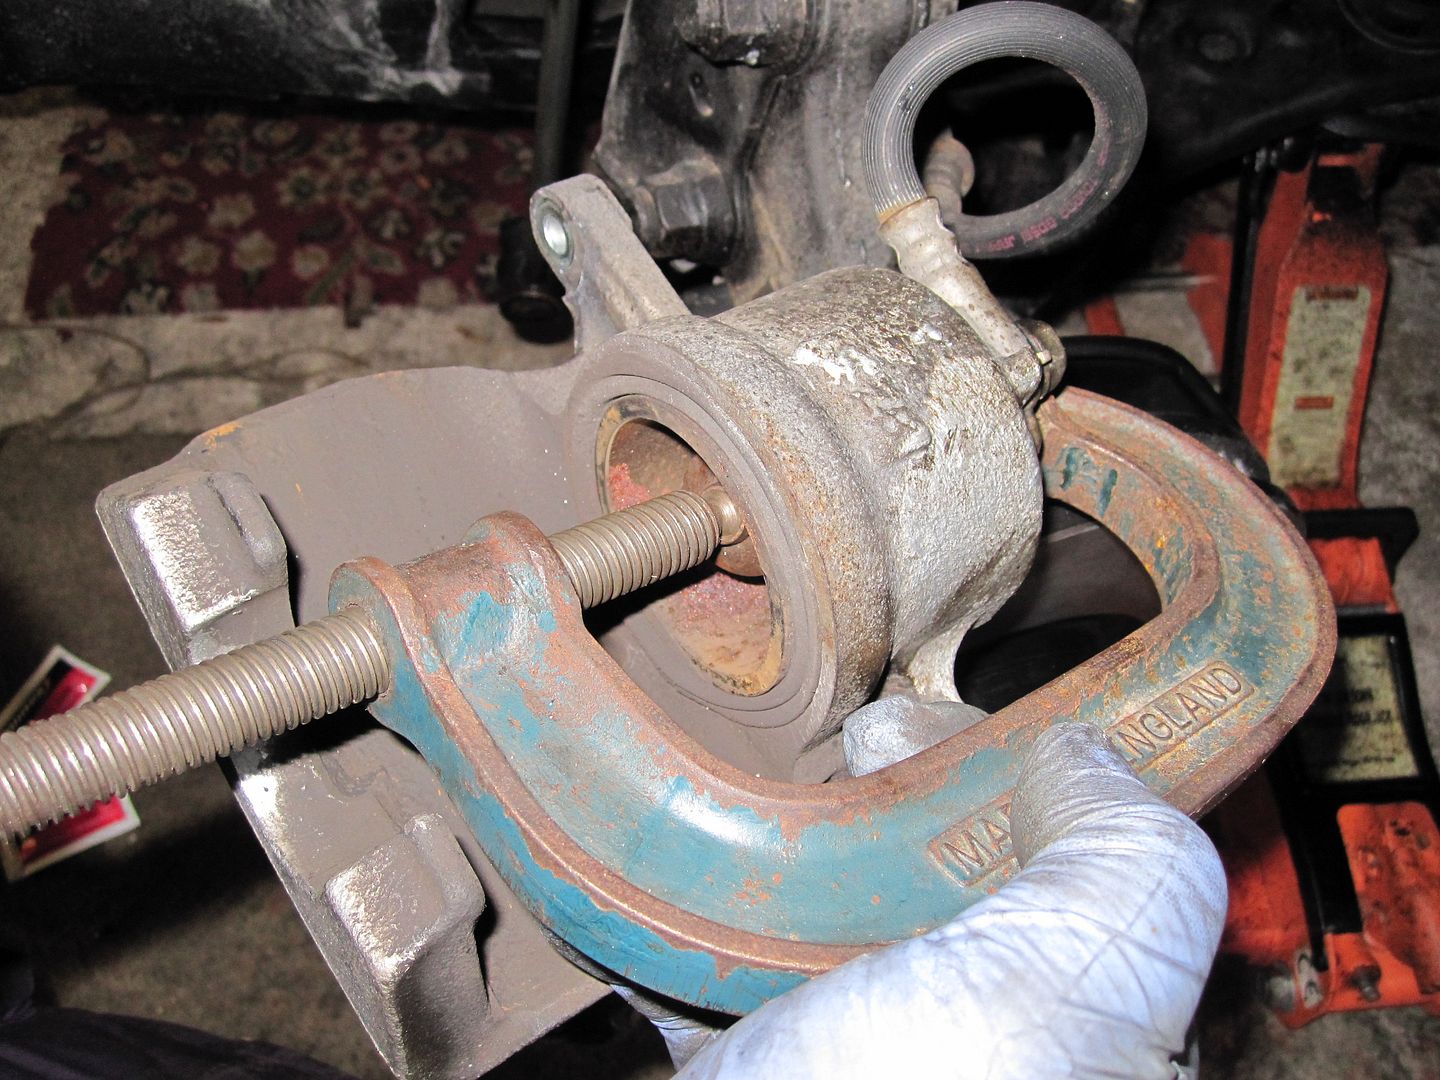
Watch the reservoir because if somebody topped it up when the pads were worn it will overflow. In this case you will have to draw some off or open a bleed nipple on the caliper to let it out. Unless there is a leak, the reservoir should never be topped up between pad changes!
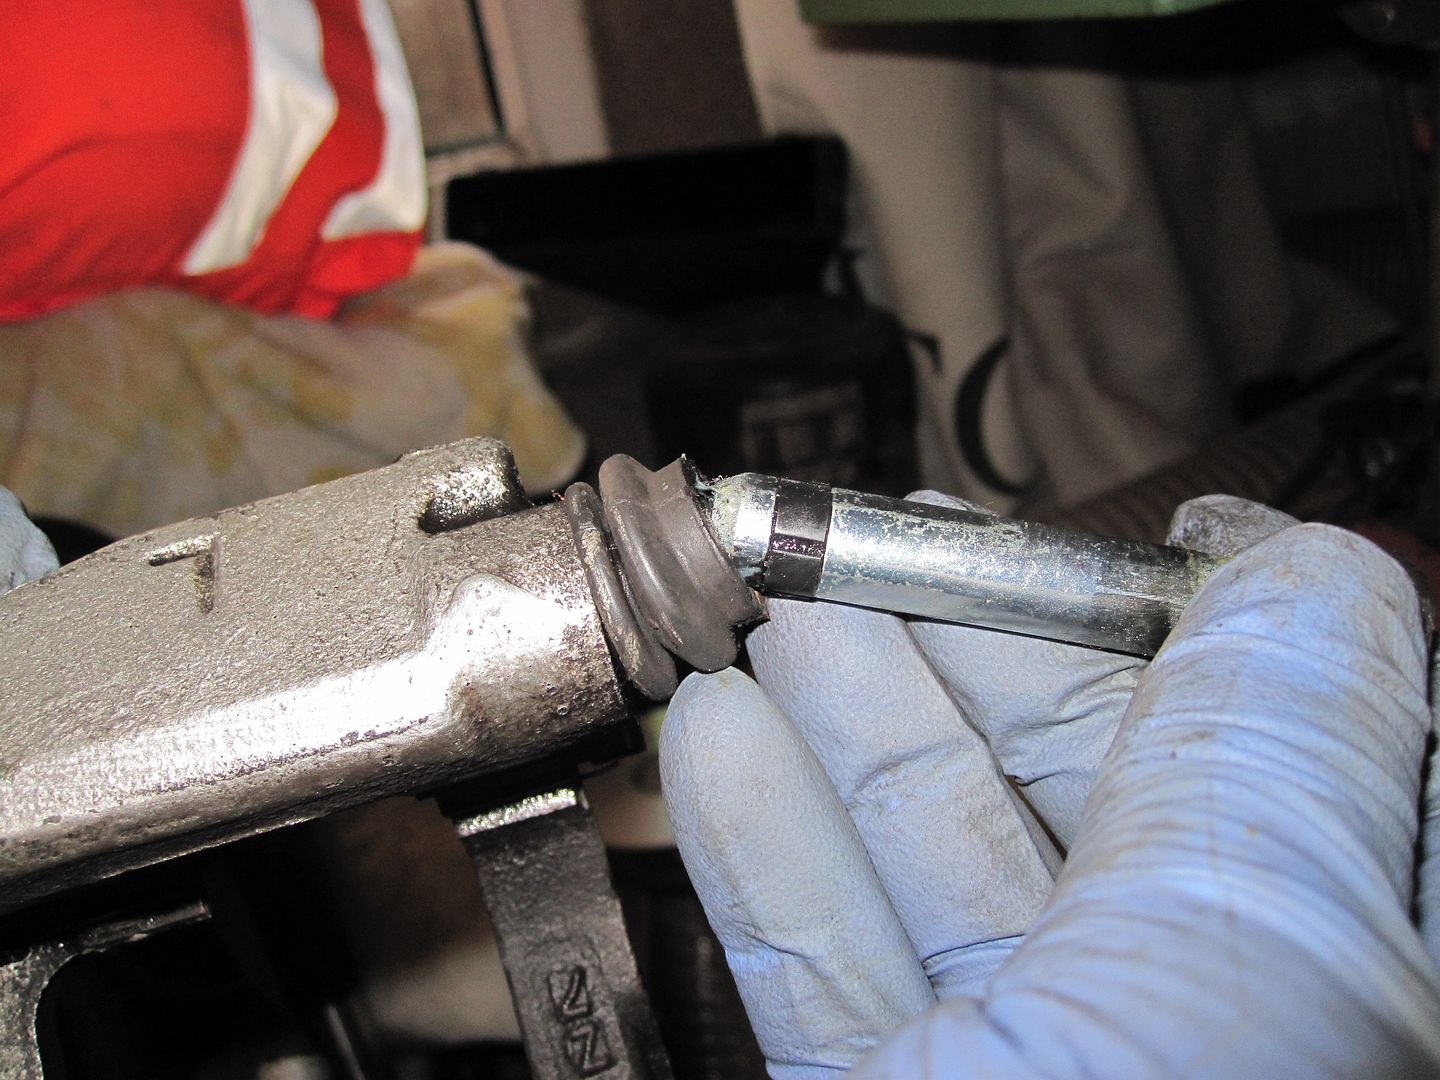
Now look at the attched picture. As the piston has gone back in, trapped air has inflated the gaiter (red arrow pointing to it).

If this was refitted now it will trap the gaiter and split it. Soon after it will need a new caliper as it will rust and seize. On one side it popped in with my finger but the other side wouldn't play ball! If it does this, just use a small screwdriver to lift the edge of the gaiter and let the air out.

Now slip the caliper over the carrier, install the bolts and tighten them to 25 ft/lb

Press the pedal a few times until it goes hard. If you forget and drive the car away, the pedal will go to the floor necessitating clean underwear and an insurance claim form. Here are a couple of photos to show what it looks like.
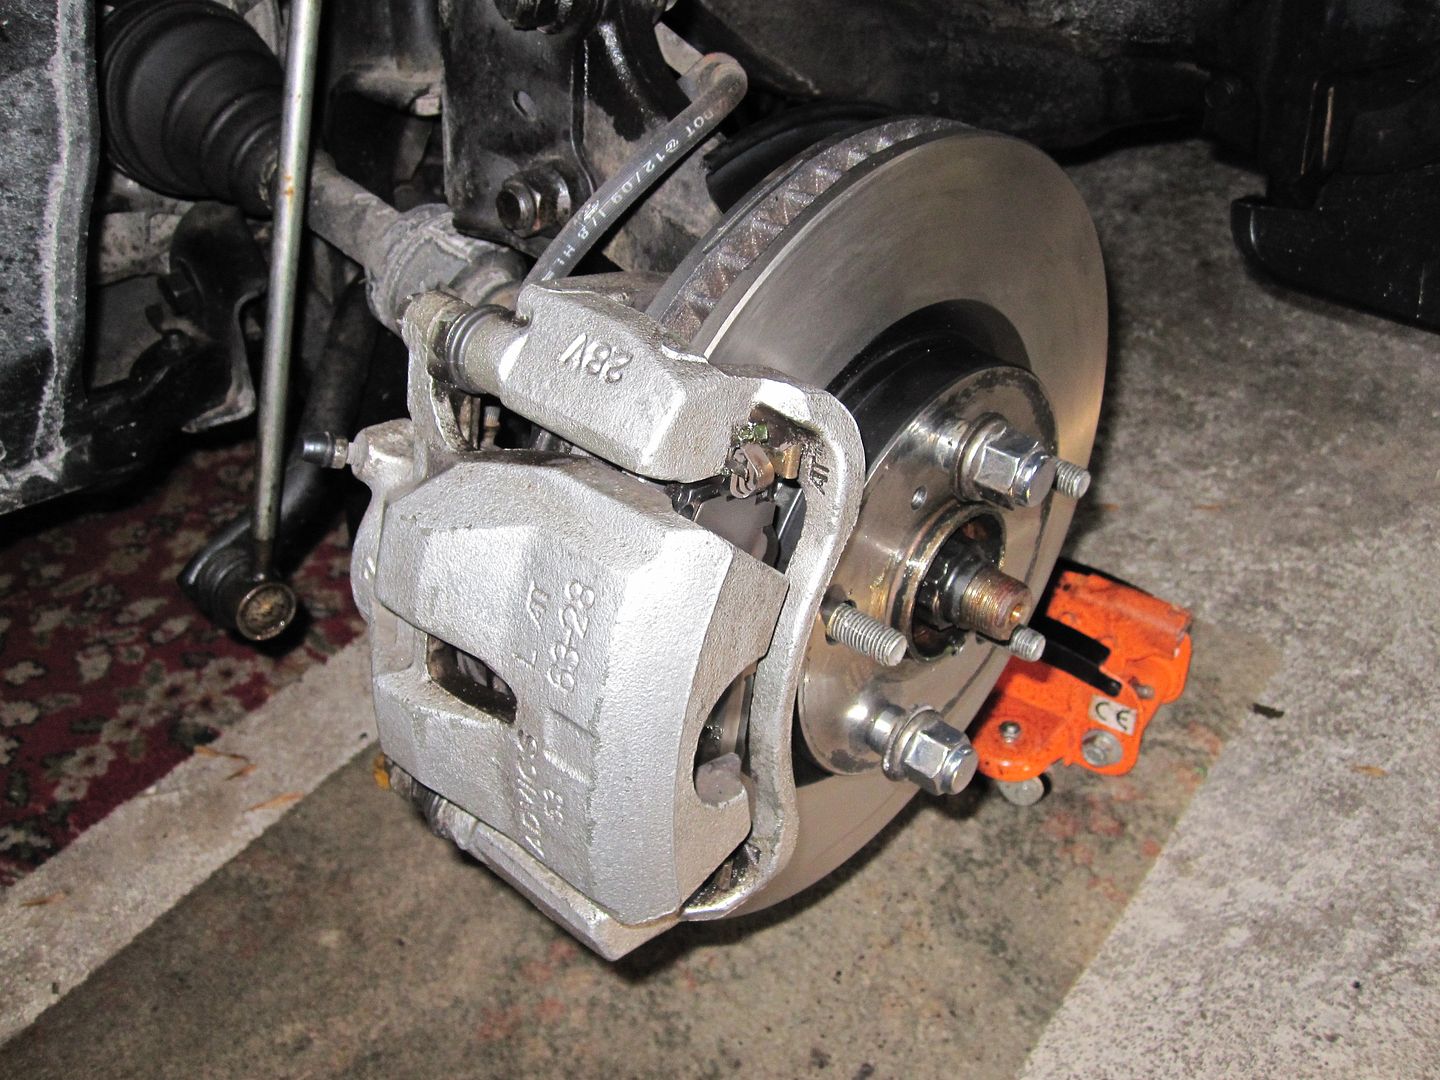

Refit the road wheel and tighten to 76 ft/lb
Lubricate the wheelnuts especially behind that fixed washer to ensure correctly torqued nuts.
Keep in mind that it is quite easy to press the brake pedal to the floor with the engine running. This is normal and nothing to worry about.
© RAV4driversclub.com 2014
Copying of this tutorial in whole or in part is strictly forbidden without express permission of Anchorman or a moderator of RAV4driversclub.com
Wed Feb 19, 2014 5:12 pm
© RAV4driversclub.com 2014
In this tutorial we will be looking at the process for changing the front pads on the popular 4.3 (Version 3 from 2006 to 2012). Note - the process is similar for the 4.2 and exactly the same for the 4.4.
Difficulty - Easy
Time - About an hour each side.
Tools -
Jack and axle stands.
Wheel brace and locking nut key.
14mm socket or spanner.
17mm socket.
A selection of files, abrasives and cleaning materials
Work in well lit and ventilated conditions.
Introduction
The brake pads on the front of the RAV4 are about the most simple to change that you will ever come across. The pads are mounted in a floating caliper which has a single piston and and a bridge which applies the outboard pad with an equal and opposite force. The disc is mounted directly on the hub with no fixings. Up until 2009, the pads on a 4.3 were made by a Japanese company and were prone to transfering some of the material onto the disc. This could result in excessive corrosion and DTV (disc thickness variation) - a wobble or vibration that could be felt through the car when braking. In this case the only solution is to machine or replace the discs. Discs should only be machined if the minimum thickness of 25mm is not exceeded and then consideration to cost effectiveness should be taken.
Vehicles after 2009 were fitted with a more abrasive German friction material. In fact this has the effect of keeping the discs clean and true. In most cases the ratio of pad/disc wear is not better than 2:1 and in some cases 1:1. Good quality discs made from grey cast iron are readily available. Brake pads are available from Kingo who will post them to you at a discounted rate. The original equipment brake pads in post 2009 RAVs is Textar T4146 and current spares from Kingo should say the same on the back. Avoid old stock which could be the troublesome early material - marked "Advics".
Other suitable friction materials are;
Apec
Ferodo Premier
Pagid (Eurocarparts)
Mintex
Note. Some of these manuafacturers market a budget brand which is designed to compete with cheap imports. Generally you get what you pay for so always try to source good quality parts. If in doubt - ask.
The car used in this tutorial belongs to our very own shcm. His car is maintained to a very high standard and he chose to replace the discs at the same time. The mileage was approximately 40k.
Method
With the road wheel removed and the car place safely on stands, remove the two bolts from the caliper (14mm spanner or socket).

Wriggle the caliper and slide it off the disc. It can now be suspended on a piece of wire. Do not hang it on the pipe.

At this stage you can remove the pads from the carrier. Keep them in their respective places so that you can copy the positions of the shims and clips. Note. Earlier pads were fitted with an audible wear indicator. This goes to the inside and the top. It is absent from post 2009 models. Next, undo and remove the two bolts that hold the carrier to the hub (17mm socket and long bar - tight!). You can see in this photo that I have left the pads in the carrier. You can also see the degree of wear.


With the disc exposed, you can now take a lump hammer and tap off the disc. If the discs are to be re-used, do not disturb them. If they need to be removed for access to another component, be sure to use a piece of wood as shown.

Now its clean up time. I have a bowl with soluble degreaser and a spray. Wash down and dry the backplate and hub.

On the bench, strip down the pads noting their position. You can easily make out the piston side. Wash and dry the shims. If they are damaged significantly, order some off Kingo but sit down for the price. They are expensive but normally re-useable. Do not be tempted to miss them out.
Take the stainless steel locating clips out of the carrier and keep them in their relative positions. Now use a file and a wire brush to remove any corrosion from under the clips. If it is not removed, the rust can cause the pads to stick and the brake to bind. Time spent properly cleaning will reap dividends in terms of reliability. Fit the stainless clips back in the carrier. The looped part goes on the hub side and they face outwards. The little thrust springs on the pads go at the top. While the carrier is off, hold the rubber boot and pop the guide pins out. They are not the same so watch where they came from. Wipe them clean and give them a coat of new grease.


Now is a good time to talk about grease. Despite what the manufacturers say, copper based greases are not ideal for building brakes up. It is good for manifolds and other very high temperature applications but it is clay based and tends to congeal with time. The best grease is Ceratec which is available freely on the internet.
www.ebay.co.uk/itm/MINTEX-CERATEC-CERA-TEC-ANTI-BRAKE-SQUEAL-ADVANCED-LUBRICANT-GREASE-75ml-/110927850373#ht_1780wt_962
Textar is the same brand as the original pads but it is also branded Mintex and Pagid which are all in the same group.

It can safely be used for the rubber parts in the brake but not the main piston seal.
OK, you can start to build the brake up. Mount the disc onto the hub and run a couple of wheel nuts up finger tight just to hold it in place. You will see that it has been thoroughly cleaned and as shcm is very fussy, a couple of coats of matt black paint applied to the exposed part. Black Smoothrite is perfectly acceptable although matt finish is the same as the original.

Install the carrier and tighten the bolts evenly to 79 ft/lb.

Fit the springs and shims to the pads as they came off and fit them into the carrier. Tilt the hub side in first and then just turn the front side in - they will just pop in. Now use a G clamp to slowly press the pistons back.

Watch the reservoir because if somebody topped it up when the pads were worn it will overflow. In this case you will have to draw some off or open a bleed nipple on the caliper to let it out. Unless there is a leak, the reservoir should never be topped up between pad changes!
Now look at the attched picture. As the piston has gone back in, trapped air has inflated the gaiter (red arrow pointing to it).

If this was refitted now it will trap the gaiter and split it. Soon after it will need a new caliper as it will rust and seize. On one side it popped in with my finger but the other side wouldn't play ball! If it does this, just use a small screwdriver to lift the edge of the gaiter and let the air out.

Now slip the caliper over the carrier, install the bolts and tighten them to 25 ft/lb

Press the pedal a few times until it goes hard. If you forget and drive the car away, the pedal will go to the floor necessitating clean underwear and an insurance claim form. Here are a couple of photos to show what it looks like.


Refit the road wheel and tighten to 76 ft/lb
Lubricate the wheelnuts especially behind that fixed washer to ensure correctly torqued nuts.
Keep in mind that it is quite easy to press the brake pedal to the floor with the engine running. This is normal and nothing to worry about.
© RAV4driversclub.com 2014
Copying of this tutorial in whole or in part is strictly forbidden without express permission of Anchorman or a moderator of RAV4driversclub.com

