Post by Hoovie on Feb 5, 2018 15:24:24 GMT
Mon Jun 23, 2014 5:53 pm #1 anchorman
Difficulty - Easy
Time - about 45 minutes.
Frequency - 10,000 miles or 12 Months
Tools required - 14mm socket and ratchet with extension bar. Filter wrench (examples shown below). Drain container. Jug or measure to re-fill oil. If you decide to remove the sump shield you will need the 10mm socket and a trim tool or screwdriver to pop out the fixing studs. A phillips screwdriver to remove the clips in the access flaps. A torque wrench if you have one.
Parts - 5.9 litres of 5W/30 Semi Synthetic oil (I paid £12.97+VAT for 5 litres). I only use Morris's oil;
Note: This should be reviewed to take account of the requirements of your particular RAV4
www.morrislubricants.co.uk/
1 oil filter - 04152-31060, later part No 01452-OR010 - (See Parts-King for discounted price delivered to home address).
This is the proper oil filter socket with cut outs to engage the lugs on the filter housing. Either Google or search ebay and type in "Lexus oil filter socket". Laser do a cheaper pressed steel version.

Introduction
The oil not only has the job of lubricating the many moving parts of the engine it also accounts for about 30% of the cooling and has many other functions. These include anti foaming agents and suspension additives that stop dirt from settling and detergents to keep the inside of the engine clean. The viscosity or "thickness" of the oil is determined by a viscosity index number. Thin oil starts at zero and the higher the number the thicker it gets. The oil for the 2.2 D4D is stated as 5W/30. This means that the oil is thin when cold (5W - winter viscosity) and 30 for summer or warm. The oil is able to change its viscosity with temperature as it is fortified with a structure that bulks up as the temperature rises and maintains its lubricating qualities through a wide temperature range.
The oil is in an extremely hostile environment. Inside the engine it is subject to extremes of pressure and temperature. It becomes contaminated with carbon and fuel which escapes in small quantities past the pistons and as the engine cycles through temperature it produces significant amounts of condensation which is also suspended in the oil. Over time these contaminants create quite a corrosive cocktail and so must be renewed periodically to maintain engine life. Healthy oil will significantly improve the lifespan of seals, gaskets and timing chains in addition to major engine components.
If there is one piece of advice that you will benefit from more than any other it is to change the oil at least as specified if not sooner. My RAV has done just less than 13k and is not 2 years old until September but because of the low mileage I have changed the oil 3 times in this period. Generally the lower the mileage the more water gets into the oil and frequent changes are adviseable. Those vehicles doing 10-12k per year or more are less vunerable and can comfortably be left the full year or 10k whichever comes first. The oil and filter change forms the basis of the intermediate service. Even if you have to buy some items to get set up you can then change your own oil and ask your Toyota Centre to do the rest of the service which will cost considerably less.
In summary the oil is the life blood of the engine. If you neglect anything else you risk damage. If you neglect the oil you will definitely ruin the engine.
Procedure
The oil becomes extremely hot so be sure to change the oil when the engine is warm. Warm oil will also drain out of the engine more thoroughly. To help with the clarity of the photos I put the car onto ramps but it is possible to do it on a level surface or to aid the process slightly you can drive it onto sturdy blocks of wood. Do not use concrete blocks or bricks as they can crumble under the weight. It is possible to gain extra access by driving the drivers side wheel onto a convenient kirb. The onus on gaining more access safely is with you!
If you have sensitive skin use barrier cream or disposable gloves and have a good supply of rags for any spillage.
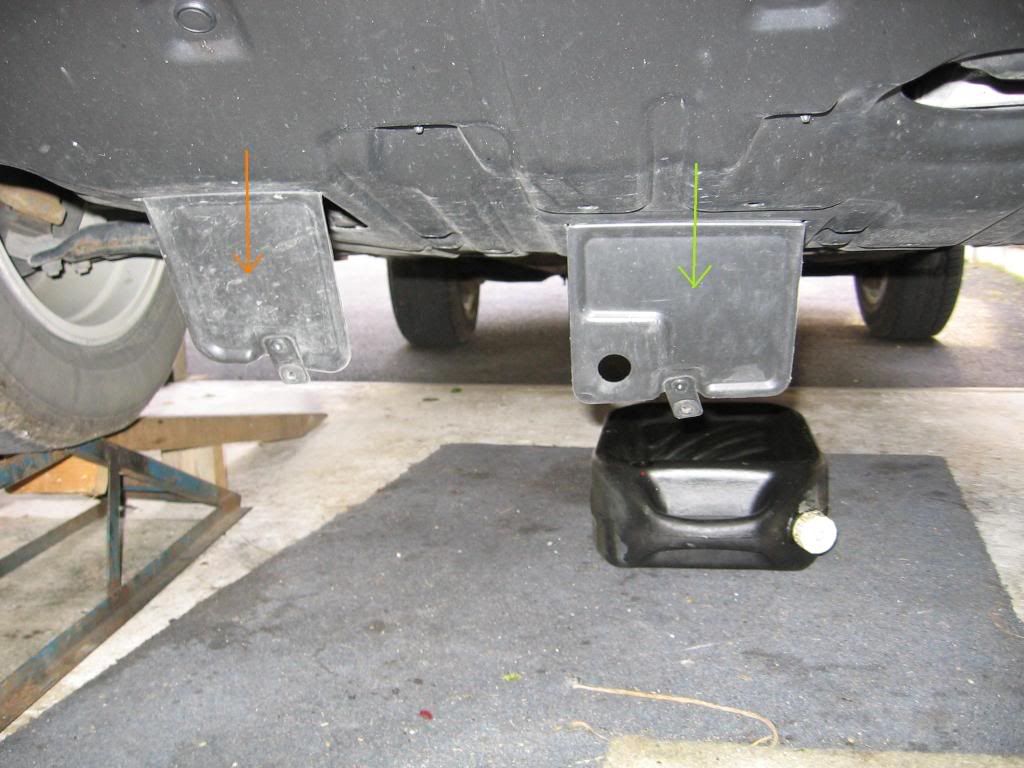
Accessing the sump plug and filter is done through 2 flaps in the sump shield. The left flap with the red arrow points to the filter and the right green arrow points to the sump plug. To undo the flaps unscrew the phillips screw carefully then pop out the stud with a trim tool or screw driver;
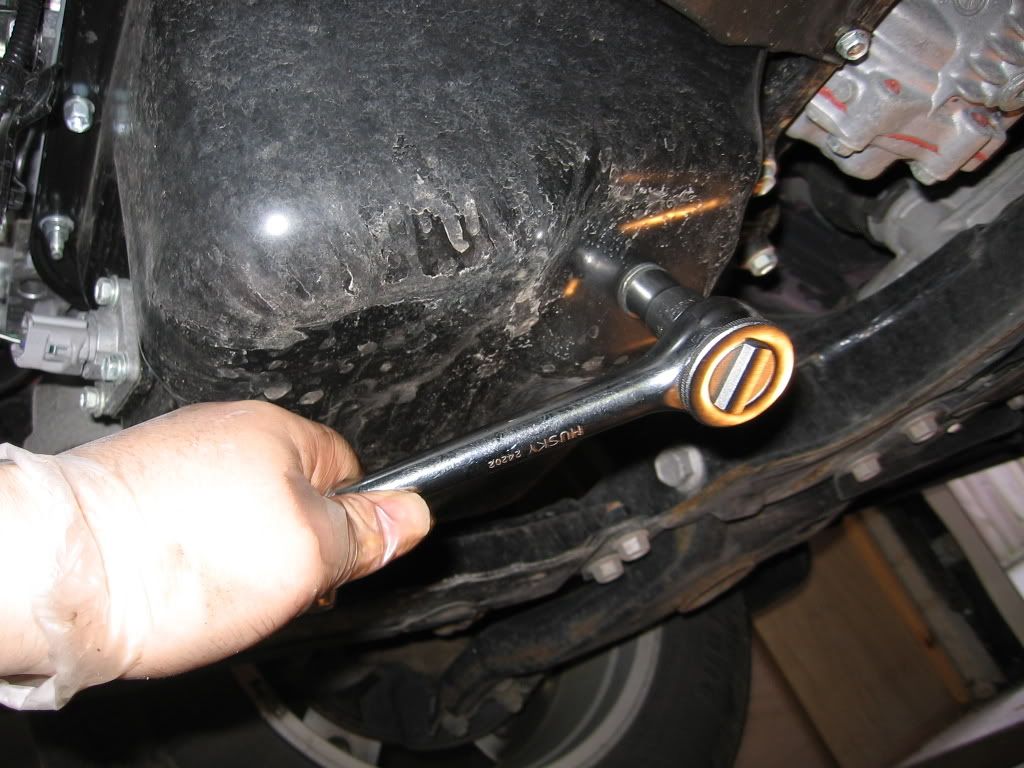
You can see much better in this picture with the sump shield removed. Use the 14mm socket to remove the sump plug;
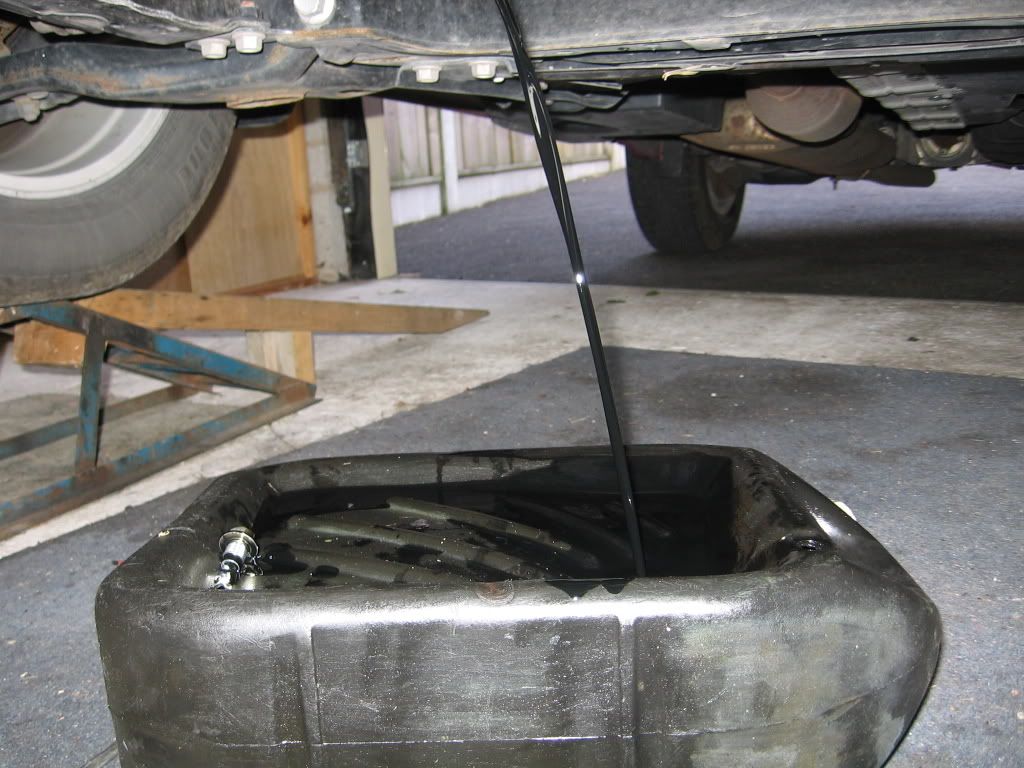
and carefully position your container to catch the oil;
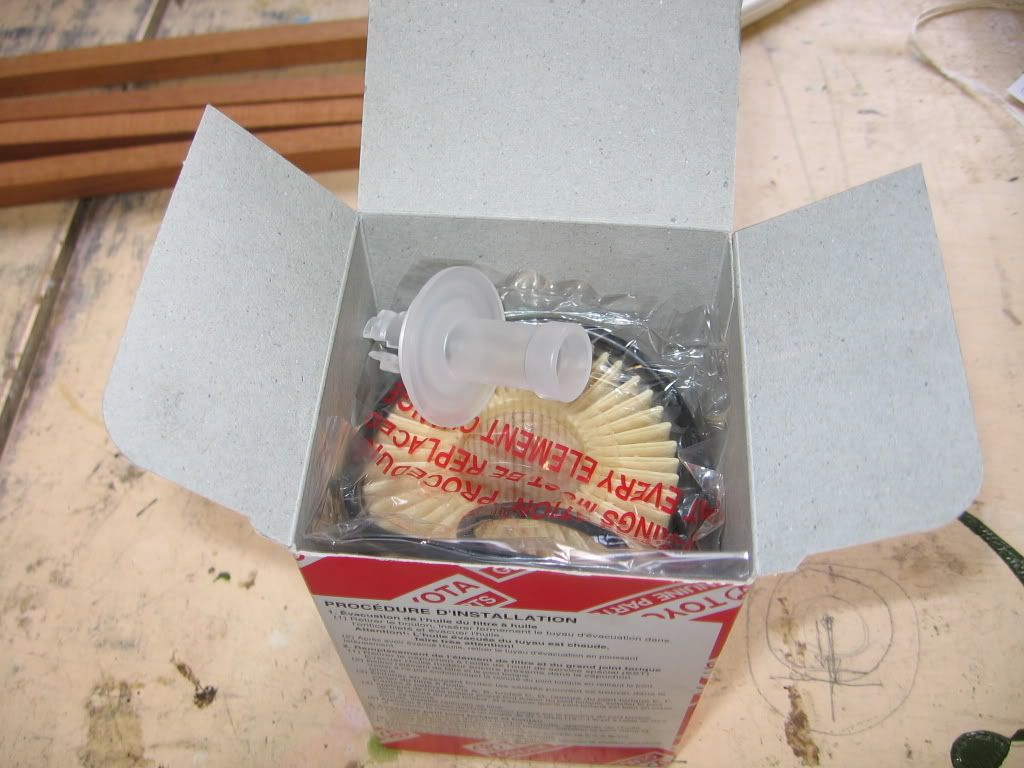
While that is draining get ready to change the filter. The box comes with the new rubber O rings and also a drain adapter for draining the filter which would otherwise result in oil all over the place;
Find a piece of hose or pipe to fit the adapter. Remove the plug in the filter case with the 14mm socket;
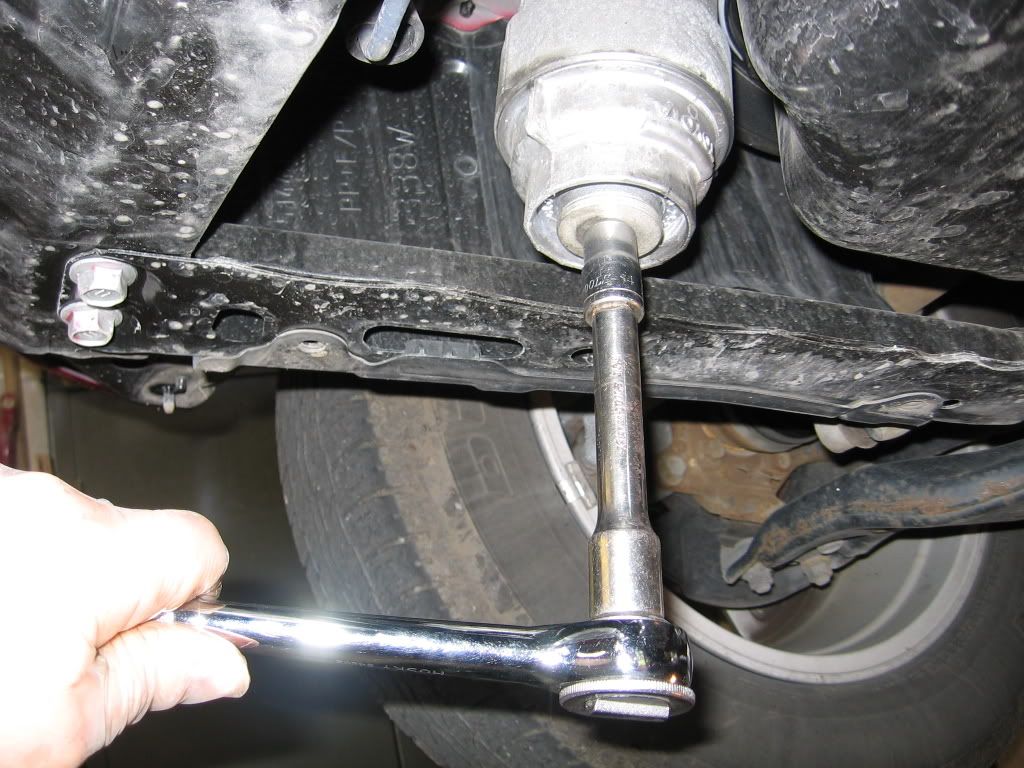
then push the adapter and pipe into the filter which will lift a valve and drain the oil into your container;
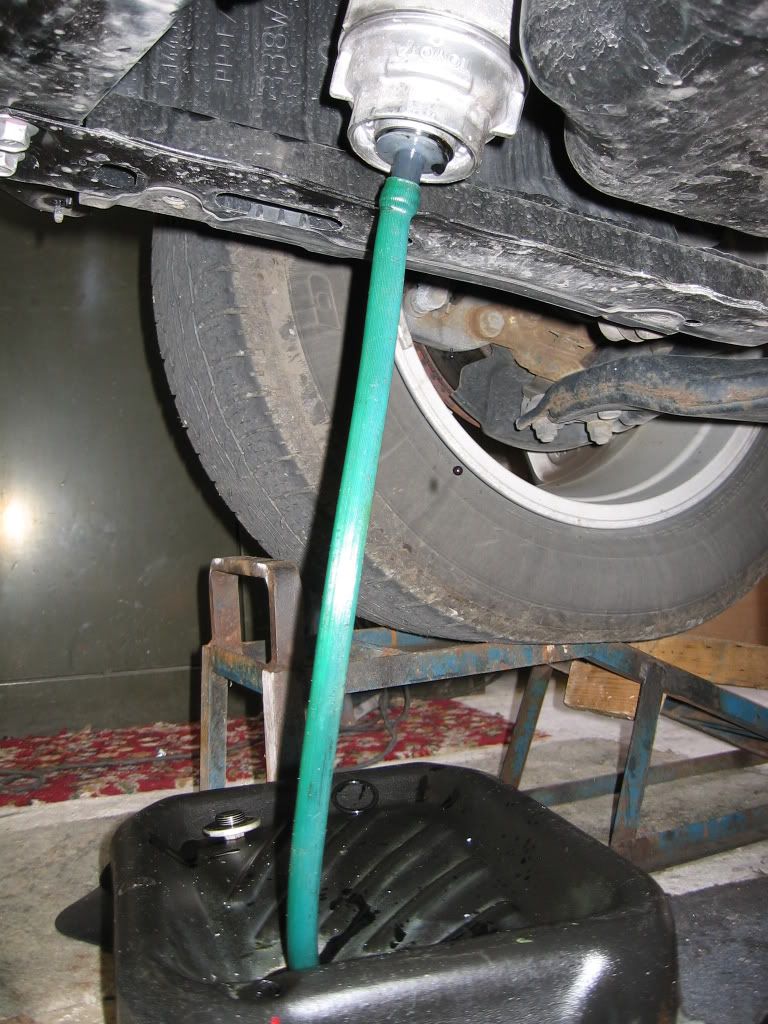
When the oil has drained remove the adapter which will automatically withdraw the old sealing ring> Use a socket or filter wrench to unscrew the filter housing;
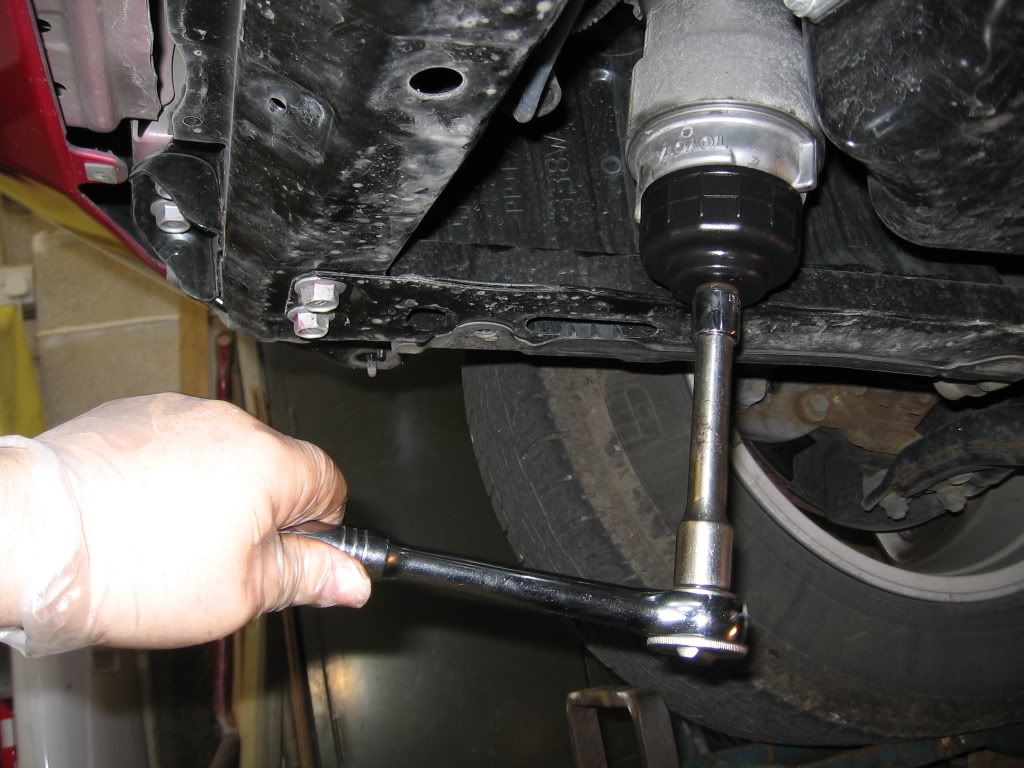
Remove the housing and filter and I worked in a tray on the bench. Drain and wipe out the filter housing with clean rags. Remove the old sealing ring and fit the new one. When you fit the new one do not roll it on but stretch carefully over the filter housing then work your way down to the groove. A twisted seal may leak oil;
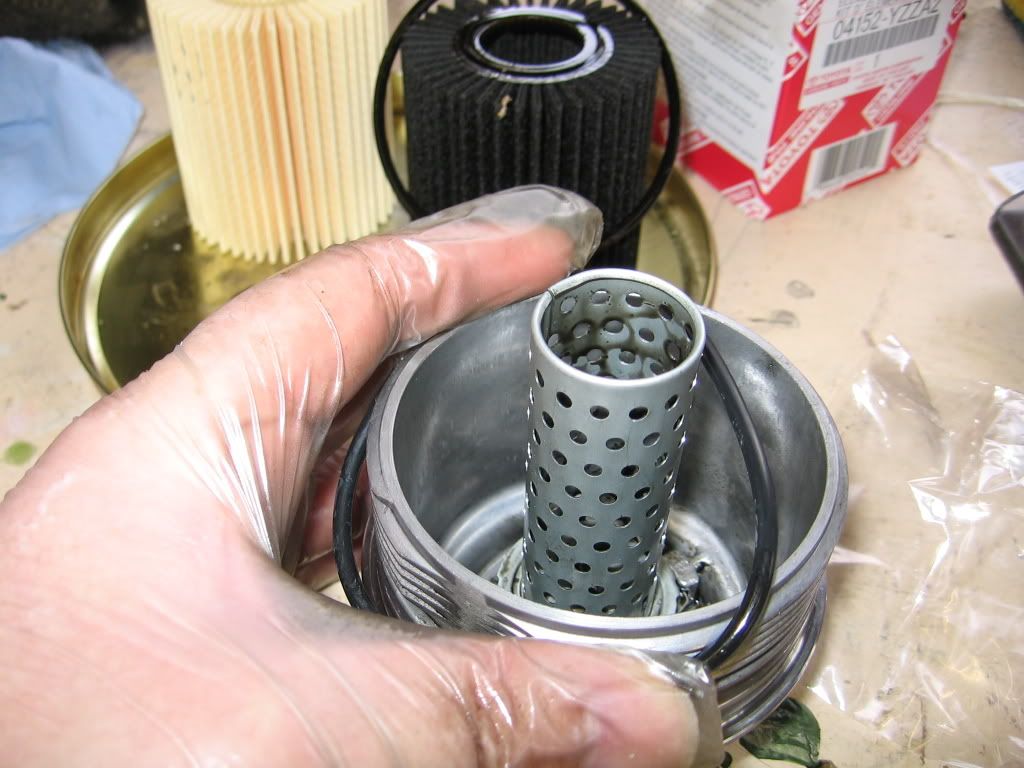
Lightly oil the new ring with clean engine oil. Clean out the housing on the engine with clean rags. Fit the new filter then screw the assembly back onto the engine. The torque is 40Nm or 30ft/lbs. If you don't have a torque wrench the filter needs to be nipped up tight but don't go mad! Clean the filter plug and fit the new O ring. Lightly oil the ring with clean engine oil and screw the plug back into the filter housing. The torque is 12.5 Nm or 9ft/lbs. Again if you do not have a torque wrench this only needs nipping with a short socket bar or 14mm spanner.
Clean the sump plug and refit it to the sump. If the sealing washer is damaged in any way fit a new one (ask Kingo for a new one when ordering the filter). The torque for the plug is 38Nm or 28 ft/lbs or again if you don't have a torque wrench tighten it securely with the 14mm socket and ratchet.
Fill the engine with 5.9 litres of 5W/30 semi Synthetic oil. In this photo I have removed the engine cover (it just pulls off) for clarity;

With the oil added ensure the gearbox is in neutral and start the engine. Watch the dash board to see that no engine warnings are displayed. When the oil pressure rises in the engine you will hear the engine note change. Go back underneath and check the filter and sump plug are not leaking. Leave the engine running for 5 minutes then check again for leaks. If all is OK refit the flaps. Newer engines will use more oil than older ones so check the oil frequently with the dip stick until consumption has been established.
To reset the oil service indicator do as follows;
Set the multi-information display to TRIP A.
Turn the ignition switch off.
Press and hold the ODO / TRIP switch, and turn the ignition switch on (IG).
After turning the ignition switch on (IG), keep holding the switch for at least 5 seconds. The reset procedure is complete.
Dispose of the oil considerately. All local authority waste disposal sites will take waste oil so will most local garages if you have a good relationship with one. The oily rags and old filter should be disposed of in the same way.
Difficulty - Easy
Time - about 45 minutes.
Frequency - 10,000 miles or 12 Months
Tools required - 14mm socket and ratchet with extension bar. Filter wrench (examples shown below). Drain container. Jug or measure to re-fill oil. If you decide to remove the sump shield you will need the 10mm socket and a trim tool or screwdriver to pop out the fixing studs. A phillips screwdriver to remove the clips in the access flaps. A torque wrench if you have one.
Parts - 5.9 litres of 5W/30 Semi Synthetic oil (I paid £12.97+VAT for 5 litres). I only use Morris's oil;
Note: This should be reviewed to take account of the requirements of your particular RAV4
www.morrislubricants.co.uk/
1 oil filter - 04152-31060, later part No 01452-OR010 - (See Parts-King for discounted price delivered to home address).
This is the proper oil filter socket with cut outs to engage the lugs on the filter housing. Either Google or search ebay and type in "Lexus oil filter socket". Laser do a cheaper pressed steel version.

Introduction
The oil not only has the job of lubricating the many moving parts of the engine it also accounts for about 30% of the cooling and has many other functions. These include anti foaming agents and suspension additives that stop dirt from settling and detergents to keep the inside of the engine clean. The viscosity or "thickness" of the oil is determined by a viscosity index number. Thin oil starts at zero and the higher the number the thicker it gets. The oil for the 2.2 D4D is stated as 5W/30. This means that the oil is thin when cold (5W - winter viscosity) and 30 for summer or warm. The oil is able to change its viscosity with temperature as it is fortified with a structure that bulks up as the temperature rises and maintains its lubricating qualities through a wide temperature range.
The oil is in an extremely hostile environment. Inside the engine it is subject to extremes of pressure and temperature. It becomes contaminated with carbon and fuel which escapes in small quantities past the pistons and as the engine cycles through temperature it produces significant amounts of condensation which is also suspended in the oil. Over time these contaminants create quite a corrosive cocktail and so must be renewed periodically to maintain engine life. Healthy oil will significantly improve the lifespan of seals, gaskets and timing chains in addition to major engine components.
If there is one piece of advice that you will benefit from more than any other it is to change the oil at least as specified if not sooner. My RAV has done just less than 13k and is not 2 years old until September but because of the low mileage I have changed the oil 3 times in this period. Generally the lower the mileage the more water gets into the oil and frequent changes are adviseable. Those vehicles doing 10-12k per year or more are less vunerable and can comfortably be left the full year or 10k whichever comes first. The oil and filter change forms the basis of the intermediate service. Even if you have to buy some items to get set up you can then change your own oil and ask your Toyota Centre to do the rest of the service which will cost considerably less.
In summary the oil is the life blood of the engine. If you neglect anything else you risk damage. If you neglect the oil you will definitely ruin the engine.
Procedure
The oil becomes extremely hot so be sure to change the oil when the engine is warm. Warm oil will also drain out of the engine more thoroughly. To help with the clarity of the photos I put the car onto ramps but it is possible to do it on a level surface or to aid the process slightly you can drive it onto sturdy blocks of wood. Do not use concrete blocks or bricks as they can crumble under the weight. It is possible to gain extra access by driving the drivers side wheel onto a convenient kirb. The onus on gaining more access safely is with you!
If you have sensitive skin use barrier cream or disposable gloves and have a good supply of rags for any spillage.
Accessing the sump plug and filter is done through 2 flaps in the sump shield. The left flap with the red arrow points to the filter and the right green arrow points to the sump plug. To undo the flaps unscrew the phillips screw carefully then pop out the stud with a trim tool or screw driver;

You can see much better in this picture with the sump shield removed. Use the 14mm socket to remove the sump plug;

and carefully position your container to catch the oil;

While that is draining get ready to change the filter. The box comes with the new rubber O rings and also a drain adapter for draining the filter which would otherwise result in oil all over the place;

Find a piece of hose or pipe to fit the adapter. Remove the plug in the filter case with the 14mm socket;

then push the adapter and pipe into the filter which will lift a valve and drain the oil into your container;

When the oil has drained remove the adapter which will automatically withdraw the old sealing ring> Use a socket or filter wrench to unscrew the filter housing;

Remove the housing and filter and I worked in a tray on the bench. Drain and wipe out the filter housing with clean rags. Remove the old sealing ring and fit the new one. When you fit the new one do not roll it on but stretch carefully over the filter housing then work your way down to the groove. A twisted seal may leak oil;

Lightly oil the new ring with clean engine oil. Clean out the housing on the engine with clean rags. Fit the new filter then screw the assembly back onto the engine. The torque is 40Nm or 30ft/lbs. If you don't have a torque wrench the filter needs to be nipped up tight but don't go mad! Clean the filter plug and fit the new O ring. Lightly oil the ring with clean engine oil and screw the plug back into the filter housing. The torque is 12.5 Nm or 9ft/lbs. Again if you do not have a torque wrench this only needs nipping with a short socket bar or 14mm spanner.
Clean the sump plug and refit it to the sump. If the sealing washer is damaged in any way fit a new one (ask Kingo for a new one when ordering the filter). The torque for the plug is 38Nm or 28 ft/lbs or again if you don't have a torque wrench tighten it securely with the 14mm socket and ratchet.
Fill the engine with 5.9 litres of 5W/30 semi Synthetic oil. In this photo I have removed the engine cover (it just pulls off) for clarity;

With the oil added ensure the gearbox is in neutral and start the engine. Watch the dash board to see that no engine warnings are displayed. When the oil pressure rises in the engine you will hear the engine note change. Go back underneath and check the filter and sump plug are not leaking. Leave the engine running for 5 minutes then check again for leaks. If all is OK refit the flaps. Newer engines will use more oil than older ones so check the oil frequently with the dip stick until consumption has been established.
To reset the oil service indicator do as follows;
Set the multi-information display to TRIP A.
Turn the ignition switch off.
Press and hold the ODO / TRIP switch, and turn the ignition switch on (IG).
After turning the ignition switch on (IG), keep holding the switch for at least 5 seconds. The reset procedure is complete.
Dispose of the oil considerately. All local authority waste disposal sites will take waste oil so will most local garages if you have a good relationship with one. The oily rags and old filter should be disposed of in the same way.

